The Static Cling post talks about how to control dust in case tumblers using scented fabric softener. This is a follow up post to talk about the tumblers themselves. There are two basic types. The vibrators and the rotary tumblers. Both have their uses and will do the job. I believe the rotary tumblers will last the longest, but they cost more. They also will seal so that liquid media can be used. Most vibrators have the motor attached to the bottom of the bowl such that they will leak liquid on to the motor, thus they are not recommended for liquid media.

Over the years I have evolved the following generic cleaning method. Toss the brass (after sorting to avoid mixing calibers) into the vibrator and walnut shell media. My vibrator cleaner is the smallest size so it does not do well with a massive number of cases. In the picture below, the vibrator cleaner is on the right, and is shown with a hundred 45 ACP cases. For larger cases, like 45 colt, I only clean 50 at a time, or 25 rifle cases. I run them for about three hours. It cleans them fairly well, but I prefer a new, shiny look. For that, I use the rotary tumbler with a small amount of liquid polish (I use Dillon Rapid Polish 290) added to the corncob media, which does a fine clean and spiffy polish. I run the rotary about an hour. That is after the basic first clean. The rotary is on the left side of the picture below.

Case Tumblers

Tumblers

The two step procedure I use can be accomplished with only one case cleaner, but you will be constantly changing the media back and forth, and liquid additives are a risk with the vibrators. (Just use a tiny amount and let it absorb in the media before turning on the vibrator type.)

The rotary tumbler has seen many uses (including lapidary work) and is 25 years old. The vibratory tumbler is about a year old and has failed twice. Both times, the power lead to the motor broke at the solder joint and was re-soldered. This was due to lack of vibration protection of the motor wire connections. I suspect most vibrators will be susceptible to this failure mode. The rotary occasionally fails due to the metal roller gears wearing the plastic bin edges smooth. I correct this with quarter inch flexible door seal tape and it works great for about six months till the tape wears off and needs replacing.

When I first began reloading, it was the priming process that gave me the most grief. Every manual I consulted said that primers need be inserted such that they were about 4 thousands of an inch
below flush with the base of the case. Many were the suggestions about primer insertion tools but nowhere could I find anything about what to do if the primers would not seat even flush, much
less below that level. It seemed logical to me that high primers were a very bad thing even before I had been introduced to information about “slam-fires”. I had so many high primers that my early reloads were fired single shot in both revolvers and automatics. My first attempt to solve the problem was to really look at a de-primed case and figure that the sludge left in the primer hole was enough to prevent a new primer from seating correctly. I invested in about every primer pocket cleaner on the market, but to no avail. I even started tumbling de-primed brass just to clean the primer pockets. I also tried every brand of primer I could find.
I tried re-seating primers with much greater force, which would bring them flush but deformed looking.  That is with a ram-prime style tool. I broke several Lee Hand Primers trying this technique. I finally stumbled across an article, Guns and Ammo I believe, that talked about how brass cases in the primer area should deform slightly when fired, and would thus need some “repair” before reloading. Now that worked. Here it is.

Problem: High primers or primers that cannot be seated below flush with the base of the case. Cause suspected to be a deformed or slightly shortened primer pocket.

Solution: Primer pocket uniformer tool, not to be confused with pocket cleaners or military crimp removing tools. The uniformer will hand machine (or by drill with appropriate attachment) a primer pocket back to the specified depth for the specific primer size used. I tried the most inexpensive first. Yep, cured the problem right off. But the tool broke with not much use. Same with the next. I ended up with a custom set for large rifle, large pistol (different depth than rifle), and small pistol (same depth as small rifle) with a hand tool from Sinclair. Great, much use, and still going. All my primers compare directly with factory ammo. Throw the pocket cleaners away. These re-machine the pocket brass and that includes the sludge as well.

http://www.sinclairintl.com/product/10922/Primer-Pocket-Tools

See how the pocket shines when the base is set back to specs ? The orange cap is the protective cover to protect the carbide cutting blades.

Primer Pocket Uniformer

This is one of those steps in reloading where it is easy to become paranoid, and if you are, then use the paranoia to focus on safety.

If I were an ammo factory, I would be in a statistically risky business which would demand that I take a statistically altered (very expensive) approach to quality checks throughout the production
process. I do not have that kind of investment capital, but since I am producing ammo for myself, I have a strong motivation to do everything I can to reduce the possible hazards to myself to zero.
I do have an advantage over an ammo factory in that my own time is available to add in exchange for lacking capital to buy all kinds of sensors for QC checks. Hopefully, I can show you how that
works, and use my approach or not, the added safety factors are there.

PROBLEM: I am so paranoid about squib and overcharge loads that I am willing to devote as much additional time to the reloading process as necessary to reduce the probability of such an event occurring at my reloading bench to zero (the goal). To do this, I continue to research the sources of errors in reloading with respect to squibs and overcharges. I believe the primary source to be a combination of the use of powder dispensers and inattention or distraction during the charging process.

SOLUTION: What I have reached is an elimination of the powder dispenser as a means of dumping powder. Since I have a Dillon Progressive, the powder station is still there but kept empty and sealed, since I use that station for case mouth expansion ONLY. After case mouth expansion, I remove all cases (usually in lots of 50 at a time) to a separate bench where I manually dispense powder into the weigh scale one case at a time. Every case is hand-weighed and hand filled. After this, each lot of cases are positioned for inspection and all 50 cases have to look like clones of each other. When these cases come back to the loading bench, each case is examined again before placing the bullet and entering the bullet seating station. As to the weigh scale, it is calibrated before and after each 50 cases by using a mix of precision weights that EXACTLY equals the powder charge weight desired. To illustrate this, in the picture below, I show my scale along with a blowup of the precision weight set for calibration. This whole process adds about 20 minutes of time to the powder charge step (for each lot of 50 rounds), which I consider to be my own version of the equivalent of factory quality check sensors.

Weighing powder

Weighing powder

So you want to start reloading ?

OK, first question is why ? Not being rude but the answer to that can be very telling as to your projected success in the task.

To save money due to the increasing cost of commercial ammo ? That does not happen with most successful reloaders. You will end up shooting more, ergo just shooting up the cost savings.

To be able to shoot when commercial ammo is scarce like it is now ? That is a better reason since it is more realistic.

Whatever the reason, reloading is a hobby in its own right. That is a good thing. It is also very repetitive, and can be considered dull and boring, but with a serious twist. The level of attention required, even on dull repetitive tasks, is hard to maintain but loss of that attention or generic distractions from those tasks can get you into trouble very fast. I like to compare it to driving a car, except there is no license needed for reloading. Long trips can be boring but loss of attention from fatigue or whatever can be all it takes to become a statistic. Likewise, there are all kinds of drivers out there, good and bad. Probably not what you want to hear but the parallel is very accurate.

Still want to go there ? OK, lets get started. Read. Then read some more. The ABC’s of reloading is a good primer. There are many others. The recipe books are also good. A recipe is a safe load parameter for a given caliber. The one I like best is the Lyman 49th Reloading Handbook. They do not cover a lot of gun powders, but they do cover both Lead and copper jacketed loads, and since they are a ballistics laboratory, they have pressure data as well. Most powder manufacturers also provide recipes on their websites.

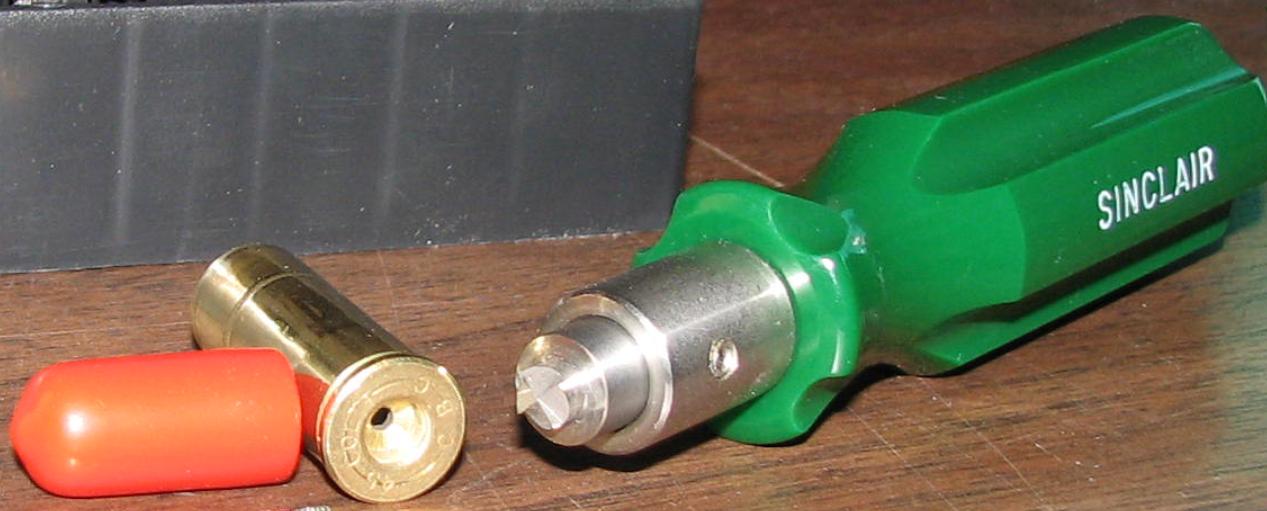
Next is what ? You will probably be thinking about a Reloading Press. Not yet. Reloading has a strange division of labor. In my opinion, most of the labor is up front, getting cases prepared for final assembly. Most of the cost is on the tail end, getting the prepared cases assembled with powder and bullets, which is not very time consuming. Every forum I visit has the same story in reloading. What kind of Press do I need ? Then they run out and buy whatever had the most recommendations. Then the real questions begin, and NO RELOADING happens for a very long time. It don’t matter what they bought, they cannot use the press at all until they have cases properly prepared for loading. Some will bypass that by buying virgin brass so they can get started. Oopps. I can’t get the primers installed correctly. How do you do that ? The books say install primers 0.002 – 0.004 inches below the base. Mine stick out no matter what I do. Is that bad ? And it gets worse from there.

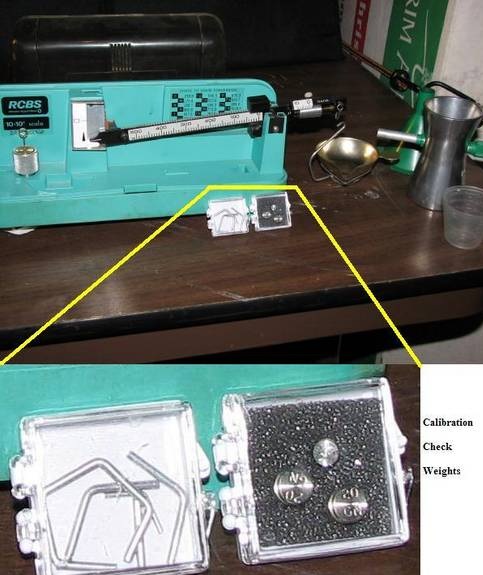
The books will tell you the general procedures and a good idea of what is required to produce good ammo. What they will not tell you is how to handle each step when you have a problem, because they cannot predict what you will encounter. Reloading requires that you manufacture something in your home, garage, etc., accurate to thousandths of an inch, and weights accurate to a tenth of a grain. There are 7000 grains in a pound, and 4,375 tenths of a grain in an ounce. It will amaze you at how creative people can be with problems when they start trying for laboratory accuracies in their garage. Especially when most of them have never been around a laboratory. Lets compound the situation by turning these folks loose with class A and B explosives.

This is where safety takes on a new meaning. I reload for myself, so I want to be absolutely anal retentive about safety. Meticulous, always looking for safer ways to do things. So much so that I almost do not trust factory ammo any more. I know a few reloaders that I trust and will shoot their ammo, because I have reloaded with them and I know them to be every bit as concerned about loading safety as I am. I know a lot more whose ammo I would not shoot on a dare.

Still want to dive in ? I will recommend an approach that few will ever take, because it makes sense. After the reading is done, start on the case preparation area. If possible, find an experienced reloader to work with. Acquire some basic case preparation equipment and use those first cases with the experienced reloader’s equipment to go through the loading steps. Get hands on exposure to the process and get by shooting your first loads. You will see how the process works for another loader and can better make adjustments for how you would like to do it. You will have experience with at least one type of loading press and be amazed at how you now have a feel for what is available and which equipment may better work for your own personal approach.

What I recommended above is what I am sorta doing now with one of my shooting buddies. He works full time and don’t have a lot of free time. My incentive for this is that I am playing with the idea of writing a book on reloading to address these uglier issues and need some hands-on experience with whether or not I can teach this stuff safely. Where we are at now is that when he gets a couple of hours or so free, usually either on a Saturday or Sunday afternoon, we get together to put together some .223’s, especially since you can’t find 223 anywhere now. Our next session will probably be this coming weekend, when we will load up a couple hundred or so 223’s. Following the 223, I can set up for a caliber of choice and away we go. I will not load for 357 Sig or 30 Mauser even if I had the dies since I believe these two pistol calibers are borderline safe even in factory loads. For pistols, I can set up for 380 auto, 9mm, 38 special, 357 Magnum, 44 special, 44 magnum, 45 auto, and 45 colt. I will probably add the .40 cal in the future simply due to popularity, even though I hesitate due to the cartridge design.

For those new to reloading, I recommend starting with a pistol cartridge for simplicity, and a revolver cartridge is the simplest of all. Rifles are a complication level above pistols and are best handled after you have some success with pistols behind you. But it never hurts to sit in on the process for rifles if the opportunity is there.

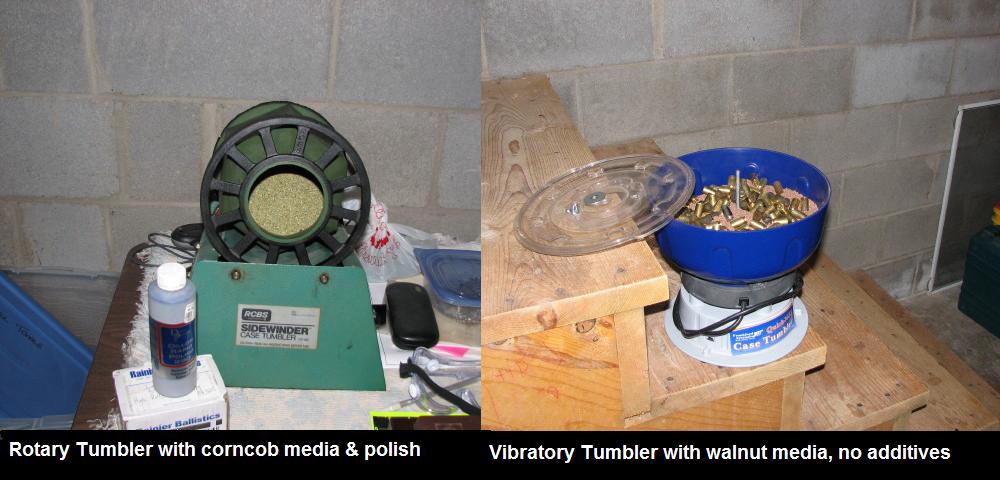
If this sounds like something you want to do, it is never too soon to start. Don’t run out and buy anything, well, except for a good reloading manual. Be ready to ask questions, and put to work doing mundane, repetitive tasks with…..explosives. But first, repetitive and mundane things like cleaning cases, reaming primer pockets, trimming cases, chamfering cases, etc. Note that doing these things for the most part does not require excessive investment, and if it drives you bonkers, you have not invested in a loading press and all the accessories there. You can still go back to factory ammo and have not spent a small fortune.


I cannot take credit for this one. I have seen it in several places and do not know who originated the idea, but when I tried it, I have been amazed at the way it works so well.

Case cleaning for me has evolved into a two stage process. First, a vibrating tumbler with walnut media for the first, rough clean. Next, a rotating tumbler with corn cob media spiked with Dillon Rapid Polish 290, to really sparkle the brass.

PROBLEM:  The cleaning media and the resultant residue means the media gradually becomes a mix of the media plus fine, silt-like hazardous dust. Primer residue like lead stiphinate and other
harmful stuff. Eventually, this dust begins to inhibit the media’s cleaning and polishing capabilities. That is when you change it out and technically, this is most likely a hazardous waste.

SOLUTION:  Bounce Scented Fabric Softener. No Kidding. The first few times cut a single softener sheet into four pieces and throw into the tumbler with the cases. Clean as usual and remove the softener sheets and carefully discard. After a few times, you only need two cuts (half sheet). This one is incredible. All the hazardous dust collects on the sheets, the media looks like new and just keeps on going like the ever-ready bunny. No fine poison dust to worry about breathing or handling. Big Grin ==> And your cases smell really good and no static cling to the powder you add.

Just try it before you point at me to tell others I am a nut case.

Reloading Issue – cases

 
OK, I will kick this example off by talking about an issue that caused me grief back before the internet when research was a royal pain. This issue deals with step number 2 above, case re-sizing. Generically, case re-sizing involves restoring the case to the SAAMI standard case size for the caliber, and is usually a straight wall “type” or a bottle neck “type”. Usually, a straight wall case refers to the short, pistol calibers, although there are larger straight walled rifle cases. The pistol cases being rather short respond very well to “carbide” resizing dies, meaning that the carbide size ring is so slick for a short pull that the brass case can be pressed through the die without the need for lubrication. And this has been my experiance. I have never had or seen a problem with carbide resizer dies on pistol
cases.

Not so with the bottle neck “types”. Even though “carbide” dies are available for some bottle neck cases, all such cases require lubrication as a result of additional forces encountered in re-sizing.

PROBLEM:  I was new to reloading and had no data source other than the manuals I had obtained. All the manuals, even today, will tell you that you must properly lubricate bottle necks. Too much lubrication will result in hydraulic case dents, too little will mean a case stuck in the die. But the “how” to achieve the “proper” part is not well explained, even today. So, time to experiment. Back then, I had a lub pad and some super honey-like, very gooey and messy lube. I glop it on the case, bolt the reloader and dies to the earth’s core, and ram the case into the die. I remove it, and ugh ! I figured out right away what a hadraulic case dent means. Several tries later, each with less and less lube, I finally have a case without dents. Success. That technique seems right. I was happy. THEN it happened. I was lightly lubeing and ramming away and wham. Resistance. I tug harder and the case just won’t come out. I really tug and the handle comes free as does the base of the case. The rest of the case is just, well, stuck.

SOLUTION:  Lets skip forward in time about three weeks later when I recieved my order for an RCBS Stuck Case Removal tool. The instructions say to remove the die decapper and drill and tap the base of the case in the primer hole to allow the removal tool to be screwed into the case and with the attachments, allow the case to be removed with a bolt pulling it out via the tap hole. Well, this tool does NOT apply if you have broken the base of the case off.

Long story short, I finally threw the die and stuck case in the deep freeze. Took it out and pushed from the top with a small wood dowel and the partial case fell out. Be sure to clean and oil the die a bit cause it will be dripping wet from the condensation. They do rust easy.